
Pages From the Heart
Wednesday, November 30, 2011
Taylor is Coming Back!
I'm excited to report that Taylor from Taylored Expressions will be coming to California for CHA and will be teaching at Pages Friday, February 3rd! I'm thinking Valentines Day will be the theme. I've told her not to bother to show up unless she has precious Madelyn with her! So all you Taylor followers, mark your calendars and call us to save a spot! 626 358-5334
Tuesday, November 22, 2011
Black Friday Sale
Black Friday sale beginning at 7:00am, 11/25. The earlier you come the bigger the discount!
Thursday, November 17, 2011
Thankful Tree
(Sorry! This was scheduled to post last Thursday but blogger had an issue! )
Hello!
I wanted to share a project that I made after I saw Becky's topiary and thankful notebook... It's a fun project that I was able to made with my little boy, and it's a constant reminder of everything in our life that we are thankful for!

I punched out a lot of different shapes from WeR's fall paper line and Adam and I talked about everything that he's thankful for. After our chat, we started writing everything that we'd thought of onto our punched shapes.
 We distressed our shapes and I punched holes in them and used Bakers Twine to turn our shapes into hanging leaves.
 Adam then hung all of our thankful leaves on a tree that my husband put together for me as part of my Anniversary present (it had other goodies on it then!). The tree is a Manzanita tree branch screwed into a wooden box base.

 Here's what one of our thankful leaves looks like...
 And here's the tree...

 We keep extra shapes in a bowl near by so we can add more leaves to our tree as we think of more that we're blessed with in our life.
Have a great day! Maybe you can make your own version of a thankful tree... once you start thinking about what you have to be thankful for, it makes the days a lot brighter!
Andi
Hello!
I wanted to share a project that I made after I saw Becky's topiary and thankful notebook... It's a fun project that I was able to made with my little boy, and it's a constant reminder of everything in our life that we are thankful for!

I punched out a lot of different shapes from WeR's fall paper line and Adam and I talked about everything that he's thankful for. After our chat, we started writing everything that we'd thought of onto our punched shapes.


Andi
Wednesday, November 16, 2011
Flowers with Michelle
Hello!
Today we'll be sharing Michelle's last project, which are these amazing, folded flowers! Last week we looked at Michelle's pumpkins that she created and made into a centerpiece, but let's take a look at her flower candlestick addition!
 Title: Candlestick Wreath
Featured Collection: We R Memory Keepers' Autumn Splendor

DT Member: Michelle McClure
Dedicated to: Flower Lovers


 Some variations I made were:
*I chalked the edges of each mini-sheet of paper.
*I hot glued each finished flower onto a wired ribbon. This way, the flowers are not permanently attached to the candlestick but can be easily taken off if I still want to decorate the candlestick for another holiday, like Christmas.
*I tied the ribbon around the candlestick and curled the bottom of the bow.
Here it is with the pumpkin centerpiece.
Today we'll be sharing Michelle's last project, which are these amazing, folded flowers! Last week we looked at Michelle's pumpkins that she created and made into a centerpiece, but let's take a look at her flower candlestick addition!

Featured Collection: We R Memory Keepers' Autumn Splendor
DT Member: Michelle McClure
Dedicated to: Flower Lovers

I wanted to think of another project to use the 6 x 6 pads and decided to fold some kusudama flowers. This is an ancient Japanese paper model translated as "medicine ball" traditionally used for incense, but are now decorative. Here are some examples.
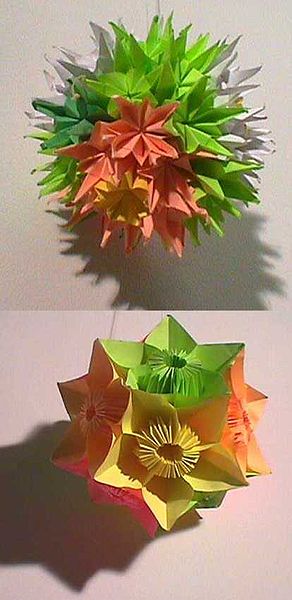
I didn't want to make the ball, but liked the flowers so I researched how to fold the origami flowers. Here is the website I used: http://foldingtrees.com/2008/11/kusudama-tutorial-part-1/
There are five petals in one bloom. Each petal is made from one piece of 3 x 3 paper. So each sheet of 6 x 6 paper can be cut down to make 4 petals without any wasted material. After folding five petals, I hot glued them together to create one flower.
There are five petals in one bloom. Each petal is made from one piece of 3 x 3 paper. So each sheet of 6 x 6 paper can be cut down to make 4 petals without any wasted material. After folding five petals, I hot glued them together to create one flower.

*I chalked the edges of each mini-sheet of paper.
*I added some stamens to the centers of the flowers. These are purchased from the floral section of a craft store. I just hot glued them in the center prior to gluing on the final petal.
*I hot glued each finished flower onto a wired ribbon. This way, the flowers are not permanently attached to the candlestick but can be easily taken off if I still want to decorate the candlestick for another holiday, like Christmas.
*I tied the ribbon around the candlestick and curled the bottom of the bow.
Here it is with the pumpkin centerpiece.
Thank you, Michelle! This centerpiece is amazing! And remember that you can see all of our Design Team Member's projects in person at Page's From the Heart! We'll see you tomorrow with my interpretation of Becky's Thankful Journal!
Andi
Tuesday, November 15, 2011
A Great Goodie from Lauren!
Hello!
Today I'll be sharing more of Lauren's Holiday inspired projects! Let's take a look!

Christmas TreeSupplies:
Fancy Pants St. Nick Paperline
Chunky Glitter
Pearl Pens
Wooden Skewer
Glue Gun
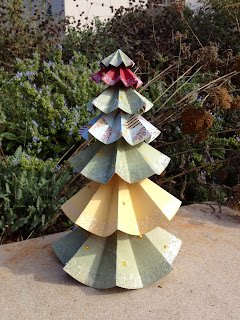
A perfect way to decorate for the holidays is a fun Christmas tree! It will look great as a centerpiece on a dinner table, too. This tree is made up of folded, paper circles, chunky glitter to create a snow effect, and Pearl Pen spots to give it some bling! All you need is paper, an adjustable circle cutter (or cups/bowls to trace), a glue gun & a skewer. Oh, and all of the fun embellishments to make your tree shine!
 Goodie Jar
Supplies:
Fancy Pants St. Nick Paper Collection
Stickers
Viva Pearl Pens
Bakers Twine
Ribbon
Misc. Jar

Every party needs some party favors! A great way to recycle jars is to give them away decorated as gifts! This jar was decorated with stickers, baker's twine, ribbon and paper folded into a rosette (with some Pearl Pen bling, of course) and can be filed with either candy, cookie ingredients and more.

 Thanks Lauren! These jars would be great filled with flowers as a centerpiece, or filled with goodies to give to neighbors or family and friends!
We'll be sharing Michelle's last project tomorrow, so come back and visit us!
Andi
Today I'll be sharing more of Lauren's Holiday inspired projects! Let's take a look!

Christmas TreeSupplies:
Fancy Pants St. Nick Paperline
Chunky Glitter
Pearl Pens
Wooden Skewer
Glue Gun
A perfect way to decorate for the holidays is a fun Christmas tree! It will look great as a centerpiece on a dinner table, too. This tree is made up of folded, paper circles, chunky glitter to create a snow effect, and Pearl Pen spots to give it some bling! All you need is paper, an adjustable circle cutter (or cups/bowls to trace), a glue gun & a skewer. Oh, and all of the fun embellishments to make your tree shine!

Supplies:
Fancy Pants St. Nick Paper Collection
Stickers
Viva Pearl Pens
Bakers Twine
Ribbon
Misc. Jar

Every party needs some party favors! A great way to recycle jars is to give them away decorated as gifts! This jar was decorated with stickers, baker's twine, ribbon and paper folded into a rosette (with some Pearl Pen bling, of course) and can be filed with either candy, cookie ingredients and more.


We'll be sharing Michelle's last project tomorrow, so come back and visit us!
Andi
Monday, November 14, 2011
We're Back with Becky!
Hello!
Today I'll be sharing Becky's final project! This month we asked our team to create projects that would inspire you with your Holiday decor and parties!
Here's Becky!
 Give Thanks Journal
Supply List
2 sheets from Fancy Pants Designs "Summer's End" collection
Brown and orange cardstock
Fancy Pants Designs "Summer's End" stickers
Viva Pearl Pen in dark brown
Ribbon
Composition book
Cricut Classic Font cartridge
It has always been my family's tradition (as it is in many homes I'm sure) to each share something we were thankful for that year before we devoured our dinner. Over the years, as family has moved away, it is still a tradition that we share whether in person or over the phone. I came across this idea of a journal for family to write what they are thankful for and I thought it would be a great addition for my family.
I covered a composition book with patterned paper from the Summer's End collection by Fancy Pants Designs and plain cardstock. I used the coordinating stickers to embellish the cover and added ribbon both on the cover and around the spine (Hint: I used Fray Check on the ribbon to stop it from fraying. LOVE this stuff!).
 The words "Give Thanks" were cut from the Cricut Classic Font cartridge at 3/4 of an inch. I finished it all by using my Viva Pearl Pen in dark brown to add some details. It was my first time using this pen and I can see why people love them!
 On the inside cover I added a personal inscription as well as a 2011 tab so that each year I can add a new tab and we can preserve these heartfelt memories.

I love this journal and think that it's a wonderful idea! I was inspired by Becky's journal and created a project to share what we're thankful for that I'll be sharing later this week.
Thanks, Becky! We'll be back tomorrow with a project from Lauren!
Andi
Today I'll be sharing Becky's final project! This month we asked our team to create projects that would inspire you with your Holiday decor and parties!
Here's Becky!

Supply List
2 sheets from Fancy Pants Designs "Summer's End" collection
Brown and orange cardstock
Fancy Pants Designs "Summer's End" stickers
Viva Pearl Pen in dark brown
Ribbon
Composition book
Cricut Classic Font cartridge
It has always been my family's tradition (as it is in many homes I'm sure) to each share something we were thankful for that year before we devoured our dinner. Over the years, as family has moved away, it is still a tradition that we share whether in person or over the phone. I came across this idea of a journal for family to write what they are thankful for and I thought it would be a great addition for my family.
I covered a composition book with patterned paper from the Summer's End collection by Fancy Pants Designs and plain cardstock. I used the coordinating stickers to embellish the cover and added ribbon both on the cover and around the spine (Hint: I used Fray Check on the ribbon to stop it from fraying. LOVE this stuff!).


I love this journal and think that it's a wonderful idea! I was inspired by Becky's journal and created a project to share what we're thankful for that I'll be sharing later this week.
Thanks, Becky! We'll be back tomorrow with a project from Lauren!
Andi
Saturday, November 12, 2011
November Challenge!
Hello!
Some of you might remember our Page's Challenges - we took a little hiatus from them, but they're back! I hope that you play along! Remember, the winner from the Challenge gets a fun goody bag full of paper crafting supplies from Pages!!
Since it's November and so close to Thanksgiving and Christmas, I was thinking of a good color combo that could be for both Holidays and so our November Challenge is a Color Challenge! Please create a project - any project - that has maroon, green and gold in it! Take a look at what our Design Team created with this color combo!
Becky created a Disney Christmas page with this color combo!
 Debra created a great gift box that would be perfect as a hostess gift for Thanksgiving or with a gift card under the Christmas Tree!
 And Lauren made a fun little card that could really be for any time, but the colors definitely make it fall-ish!
 I hope that you play along with us and create a project using our color challenge! If you do, please take a picture of it and email it to me at ayokleyjessup@gmail.com with the subject "November Challenge". All entries must be received by midnight, November 27.
We can't wait to see every one's projects!
Andi
Some of you might remember our Page's Challenges - we took a little hiatus from them, but they're back! I hope that you play along! Remember, the winner from the Challenge gets a fun goody bag full of paper crafting supplies from Pages!!
Since it's November and so close to Thanksgiving and Christmas, I was thinking of a good color combo that could be for both Holidays and so our November Challenge is a Color Challenge! Please create a project - any project - that has maroon, green and gold in it! Take a look at what our Design Team created with this color combo!
Becky created a Disney Christmas page with this color combo!


We can't wait to see every one's projects!
Andi
Friday, November 11, 2011
Fall Pumpkins with Michelle
Hello!
I hope that you've enjoyed our week of projects from the DT! If you're just joining us, this month the team created projects that would inspire our readers and customers for their Holiday decor or parties!
Today we'll be taking a look at a project that Michelle created - which is perfect for fall or your Thanksgiving table centerpiece - let's take a look and hear from Michelle!
 Title: Pumpkin Centerpiece
Featured Collection: We R Memory Keepers' Autumn Splendor
 DT Member: Michelle McClure
Dedicated to: Pumpkin Lovers
Supply List for Pumpkins:
Cardstock: Bazzill Basics
Patterned Papers: We R Memory Keepers (Autumn Splendor)
Paper Flowers & Brads Set: We R Memory Keepers
Brads: Making Memories
Twine: The Twinery
Ink: ColorBox Chalk
Other: Buttons, Glass Votive Holder, Flameless Votive
I was given the 6 x 6 paper pad from We R Memory Keepers to use. I usually only use the smaller paper pads for making cards, but wanted to see what else I could use them for. I cut the papers into half inch strips of varying lengths and created these pumpkins. The four smaller ones are made from this pad, and the largest one is made from one sheet of 12 x 12 paper from the same collection.

There are two different types of pumpkins. For one type, I hot glued some strips of paper on a glass votive holder, placed a flameless battery operated candle inside and decorated the outside.


For the second type, I punched holes at the top and bottom of the strips, secured it with a brad and spread out the strips into the shape of a sphere, and then decorated the outside with flowers, leaves, tendrils and a stem. These also had two layers of strips - shorter, solid cardstock inside and longer patterned strips for the outside.

Isn't this centerpiece amazing? I love these pumpkins, and was even thinking that it would a great project to do with a child! I was also thinking that hiding a treat inside the pumpkin would made a great hostess gift!
I hope that you enjoyed these pumpkins! Thanks, Michelle, for your awesome inspiration!
We'll be back Monday with more project from the DT! And remember, this weekend is Page's Holiday Cheer event, we hope to see you there!
Andi
I hope that you've enjoyed our week of projects from the DT! If you're just joining us, this month the team created projects that would inspire our readers and customers for their Holiday decor or parties!
Today we'll be taking a look at a project that Michelle created - which is perfect for fall or your Thanksgiving table centerpiece - let's take a look and hear from Michelle!

Featured Collection: We R Memory Keepers' Autumn Splendor
Dedicated to: Pumpkin Lovers
Supply List for Pumpkins:
Cardstock: Bazzill Basics
Patterned Papers: We R Memory Keepers (Autumn Splendor)
Paper Flowers & Brads Set: We R Memory Keepers
Brads: Making Memories
Twine: The Twinery
Ink: ColorBox Chalk
Other: Buttons, Glass Votive Holder, Flameless Votive
I was given the 6 x 6 paper pad from We R Memory Keepers to use. I usually only use the smaller paper pads for making cards, but wanted to see what else I could use them for. I cut the papers into half inch strips of varying lengths and created these pumpkins. The four smaller ones are made from this pad, and the largest one is made from one sheet of 12 x 12 paper from the same collection.

There are two different types of pumpkins. For one type, I hot glued some strips of paper on a glass votive holder, placed a flameless battery operated candle inside and decorated the outside.


For the second type, I punched holes at the top and bottom of the strips, secured it with a brad and spread out the strips into the shape of a sphere, and then decorated the outside with flowers, leaves, tendrils and a stem. These also had two layers of strips - shorter, solid cardstock inside and longer patterned strips for the outside.

Isn't this centerpiece amazing? I love these pumpkins, and was even thinking that it would a great project to do with a child! I was also thinking that hiding a treat inside the pumpkin would made a great hostess gift!
I hope that you enjoyed these pumpkins! Thanks, Michelle, for your awesome inspiration!
We'll be back Monday with more project from the DT! And remember, this weekend is Page's Holiday Cheer event, we hope to see you there!
Andi
Thursday, November 10, 2011
You're "Invited" to Spend Some Time with Lauren!
Hello!
Welcome back! Today we'll be sharing 2 projects created by Lauren that will help you with any Christmas gathering! First, we'll be sharing an invitation that will be sure to get your guests to your party and then we'll be sharing a napkin ring that will help to carry your Christmas party theme throughout!
 Christmas Invitation
Supplies:
Fancy Pants St. Nick paperline
Cardstock
Diecuts
Ribbon
 Get your guests to your Christmas party with a fun Christmas invitation! Using large images from designer paper is a really great way to save on time (especially when you're sending out a large number of invites).
 What also saves time, but makes your card look extra special, is using a die cut to add your basic information, like "You're Invited" or the details about your party.
 Luckily, Pages From the Heart has an AMAZING collection of die cut cartridges you can use at their store!
Napkin Ring
Supplies:
Fancy Pants St. Nick paperline
Die Cut
Viva Pearl Pen
Bakers Twine
Stickers

A fun way to decorate your party table this season is to add a personalized napkin ring. It adds personality to each guest's place seating while giving them a little goodie to go home with. This napkin ring was made up of stickers, baker's twine and some Pearl Pen bling.
Thanks, Lauren! Please check back in next week to see more of Lauren's projects!
We'll be back tomorrow with some great centerpiece ideas from Michelle!
Andi
Welcome back! Today we'll be sharing 2 projects created by Lauren that will help you with any Christmas gathering! First, we'll be sharing an invitation that will be sure to get your guests to your party and then we'll be sharing a napkin ring that will help to carry your Christmas party theme throughout!

Supplies:
Fancy Pants St. Nick paperline
Cardstock
Diecuts
Ribbon


Napkin Ring
Supplies:
Fancy Pants St. Nick paperline
Die Cut
Viva Pearl Pen
Bakers Twine
Stickers

A fun way to decorate your party table this season is to add a personalized napkin ring. It adds personality to each guest's place seating while giving them a little goodie to go home with. This napkin ring was made up of stickers, baker's twine and some Pearl Pen bling.
Thanks, Lauren! Please check back in next week to see more of Lauren's projects!
We'll be back tomorrow with some great centerpiece ideas from Michelle!
Andi
Wednesday, November 9, 2011

Tuesday, November 8, 2011
Let's "Hang" Out with Debra
Hello!
We're back today with a project from Debra!
If you're just tuning into us, this months DT assignment was to create a project that could used as either a Holiday decor or a table setting or an invitation.
Debra had WeR's Peppermint Twist paper line and embellishments and decided to create a wonderful Christmas project with it! Let's hear from Debra!
 Christmas Banner
Supplies:
WeR Peppermint Twist Paper and Embellishments
Cardstock
Viva Pearl Pens
Ribbon
Circles cut from festive WRMK Peppermint Twist collection are outlined with black to pop this banner against your fireplace, mirror, office door or wall. The circles are heavily layered with scalloped squares, matted paper elements, and black matted coordinating embossed stickers and finished with a touch of Viva pearls.

Miniature layered circles hang from both ends of the banner on green and white ribbons to continue the circular theme.
 Debra had such a great response to her DT project that she is now teaching it as a class at Page's! Please contact Page's to sign up for this fun, whimsical banner!
Thank you, Debra!
We'll see you tomorrow with a project from our Guest Designer, Lauren!
Andi
We're back today with a project from Debra!
If you're just tuning into us, this months DT assignment was to create a project that could used as either a Holiday decor or a table setting or an invitation.
Debra had WeR's Peppermint Twist paper line and embellishments and decided to create a wonderful Christmas project with it! Let's hear from Debra!

Supplies:
WeR Peppermint Twist Paper and Embellishments
Cardstock
Viva Pearl Pens
Ribbon
Circles cut from festive WRMK Peppermint Twist collection are outlined with black to pop this banner against your fireplace, mirror, office door or wall. The circles are heavily layered with scalloped squares, matted paper elements, and black matted coordinating embossed stickers and finished with a touch of Viva pearls.

Miniature layered circles hang from both ends of the banner on green and white ribbons to continue the circular theme.
Thank you, Debra!
We'll see you tomorrow with a project from our Guest Designer, Lauren!
Andi
Monday, November 7, 2011
Thankful with Becky
Hello!
Today is the first day that we'll be sharing our NEWEST Design Team members projects! Hooray!
The assignment for the team was to create a Holiday inspired decor or invitation to help inspire our readers with their Holiday festivities!
We'll be sharing 1 of Becky's projects today, which would look great as a table centerpiece, on your mantel or on your buffet table! Take it away, Becky!
 Fall Topiary
Supply List
3-4 sheets from Fancy Pants Designs "Summer's End" collection
2-3 sheets of cardstock
Ribbon
Pot, moss, corsage pins, dowels, Styrofoam ball
Cricut Classic Font Cartridge
I had seen one of these topiary's featured on the cover of an issue of Scrapbooks Etc. and had been saving the idea in the back of my mind. I thought this would make a perfect table decoration for Thanksgiving!
I began by making these small rose bud flowers from 3 inch, 2 1/2 inch, and 2 inch squares of paper. I put a corsage pin (I found these in the wedding section of my local craft store) through the center and then pinned it into the Styrofoam ball. In all I made about 60 flowers. As I was in the beginning stages of this, my scrappy friend kept asking me, "Are you sure about this?" It was definitely labor-intensive but a lot of fun. I made a bunch of these flowers at one time while catching up on Project Runway and then attached them to the ball.
After that was done and I had attached the dowel, I layered newspaper and a foam block in the pot before inserting the Styrofoam ball and covered it all up with moss. I cut my title using the Cricut Classic Font Cartridge (both at 1 inch) and glued the word GIVE to small dowels. It was a lot of work but I think it will be well appreciated!

Thanks so much, Becky! I LOVE this tree and think that it would be amazing done in Christmas paper or used for a baby or wedding shower!
We'll be back tomorrow with more of our teams projects to share!
Have a great start to your week!
Andi
Today is the first day that we'll be sharing our NEWEST Design Team members projects! Hooray!
The assignment for the team was to create a Holiday inspired decor or invitation to help inspire our readers with their Holiday festivities!
We'll be sharing 1 of Becky's projects today, which would look great as a table centerpiece, on your mantel or on your buffet table! Take it away, Becky!

Supply List
3-4 sheets from Fancy Pants Designs "Summer's End" collection
2-3 sheets of cardstock
Ribbon
Pot, moss, corsage pins, dowels, Styrofoam ball
Cricut Classic Font Cartridge
I had seen one of these topiary's featured on the cover of an issue of Scrapbooks Etc. and had been saving the idea in the back of my mind. I thought this would make a perfect table decoration for Thanksgiving!
I began by making these small rose bud flowers from 3 inch, 2 1/2 inch, and 2 inch squares of paper. I put a corsage pin (I found these in the wedding section of my local craft store) through the center and then pinned it into the Styrofoam ball. In all I made about 60 flowers. As I was in the beginning stages of this, my scrappy friend kept asking me, "Are you sure about this?" It was definitely labor-intensive but a lot of fun. I made a bunch of these flowers at one time while catching up on Project Runway and then attached them to the ball.
After that was done and I had attached the dowel, I layered newspaper and a foam block in the pot before inserting the Styrofoam ball and covered it all up with moss. I cut my title using the Cricut Classic Font Cartridge (both at 1 inch) and glued the word GIVE to small dowels. It was a lot of work but I think it will be well appreciated!

Thanks so much, Becky! I LOVE this tree and think that it would be amazing done in Christmas paper or used for a baby or wedding shower!
We'll be back tomorrow with more of our teams projects to share!
Have a great start to your week!
Andi
Friday, November 4, 2011
We're Celebrating 12 Years
Pages From the Heart
invites you to join us for our Anniversary Sale!
Receive 30% off your entire purchase!
Friday, Saturday & Sunday
November 4th, 5th & 6th
137 E Colorado Blvd
Monrovia, CA
626 358 5334
Thursday, November 3, 2011
Taylored Expressions November Release

Subscribe to:
Posts (Atom)